Monday, August 30, 2010
Spinach & Broccoli Lasagna
I learned how to make lasagna by watching my mom in the kitchen and it's one of my favorite things to make. It's easy, tastes good leftover (better even sometimes) and you can freeze it. Don't be intimidated by all the layers, it comes together in a snap, most of the time required is to bake the dish. I tend to be impatient when baking lasagna, especially if it's a week night and I'm hungry. The longer you can hold out, the better it tastes, so try to be patient.
Note that the ingredient quantities can be adjusted to make a smaller or larger lasagna. The amounts I list below will make a small lasagna about 6 servings (ie not too much for one person to eat over a few days), I use this IKEA pan when I make lasagna for myself. If you want to make a larger version appropriate for a standard 9X13 pan, you should roughly double what I have listed below.
Ingredients
1 small container of ricotta (I think the small ones are around 10oz but I can't remember)
2 cups shredded Italian cheese (you can use Mozzarella, but a blend of several Italian cheeses is best)
1 large egg
1 1/2 cups fresh spinach
1 1/2 cups chopped broccoli
4-6 pre-cooked lasagna noodles
26oz jar of spaghetti sauce
Garlic (to taste)
Italian Seasoning (to taste)
Black pepper (to taste)
Mix the egg and all the seasonings in with the ricotta in a medium size bowl. Grease a small (approx 11X7) baking pan. Put a small amount of pasta sauce (approx 1/3 cup) in the bottom of the pan, this helps prevent the noodles from burning on. On top of the sauce, layer ingredients in the following order noodles, ricotta, veggies, shredded cheese, sauce and starting over with noodles again, repeating until you run out of ingredients or reach the top of the pan. You should end with noodles topped with shredded cheese on the top. Cover with aluminum foil and bake at 350 for 30-60 minutes, removing the foil for the last 10-15 minutes.
As I said above, I'm impatient when waiting for lasagna. It must bake long enough for the cheese to melt but it will taste much better if baked for a full hour. Sometimes I make the double size and put single lunch portions in the freezer and pull them out to take to work when I'm in a rush or don't have anything else handy.
Taste: A
Cost: B+ (no meat!)
Waste: A+
Monday, August 23, 2010
Lemon pepper tilapia in the crock pot
My slow cooker experiences have been mixed at best, so I'm not sure what I was thinking when I decided to try and make fish in the crock pot. Seemed like a good idea when I saw the recipe at A Year of Slow Cooking. I did not use the Orange Honey Tilapia recipe but rather only copied the fish packet technique.
I had to make this on a weekend because waiting for two hours on a weeknight for something I could bake in less than 10 minutes in the oven would be horribly impractical. This technique could be really practical, however, if you will be busy prepping other dishes right before the meal and would like the fish to already be taken care of.
Simply sprinkle your desired white fish (tilapia for me) with seasoning (used lemon pepper) and fold it in a packet of foil. Place each packet it the crock pot for two hours on low or until it flakes with a fork. Simple!
Friday, August 13, 2010
Dusted off the crock pot - squash casserole
Friday morning I awoke bleary-eyed and late. I had neglected to set my alarm the night before. I also had a 9am meeting. Not a good day to get up late.
Furthermore, I had slow cooking aspirations for that day (well the day before I did not so much at 7:30). I had been browsing around the archives of A Year of Slow Cooking to see what gem I could pluck from Stephanie's blog. Since any recipe I've tried from somewhere else have all failed, ok there were only a few attempts but still.
I dusted off my crock pot - literally, it sits out on my counter and it's been so long since I used it, I had to wash it off first. And I began chopping squash to make a kind of crock pot casserole. Did I have time for this? No. I looked at the clock when almost done and had to toss in the rest of the ingredients and run out the door, puffy eyed and makeup-less for work (this was after I got bits of frozen spinach all over my kitchen). So beware, if you're doing this in the morning, it will take 20 minutes of prep-time!
Cheesy Squash Casserole (inspired by no-noodle lasagna)
2-3 yellow squash
15 oz (small container) of ricotta cheese
??? oz jar of pasta sauce
1.5 cups Shredded Italian blend cheese
4 slices provolone cheese
2 cups froze spinach, thawed
Italian seasoning
Garlic
I had intended to mix an egg and the seasoning in with the ricotta, which I do when I make lasagna but when I took the eggs, I've been meaning to use (for a while...) out of the fridge the sell by date was July 31st (and I did not have time).
Layer the ingredients in your crock pot (mine is 5 quarts), starting with sauce on the bottom, squash, ricotta (I smeared this on the squash before I put it in), sprinkle of spinach, seasoning, cheese slice and shredded cheese, until you reach the top or run out of ingredients. Rinse the pasta sauce jar with a small amount of water and pour it in before the final topping of shredded cheese.
See why this took 20 minutes? Well, really I should have thawed my spinach and chopped the squash the night before.
So was my mad dash out of the apartment worth it when dinner time rolled around? It's lovely to walk into the house to dinner. However, do NOT make this if you will not be home in eight hours. By the time my commute time was factored in it was cooking for close to ten hours...not good. I ate it for dinner and it was ok, I think it would be better if it hadn't cooked so long. Also, next time I need to check my eggs. Mixing it with the ricotta help it to have a less chunky texture, it just cooks much nicer. I ended up eating it for dinner that night but when I went to reheat some of it, it was not good and I threw the rest away. The added cooking from reheating was just too much. Finally, I think fresh spinach would be the way to go, might have been worth a trip to the store.
Monday, August 9, 2010
Fried tomatoes
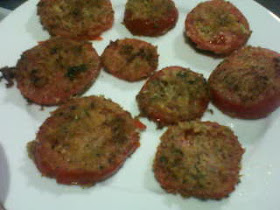
I recently discovered For the Love of Cooking, a cooking blog that is worth a visit if only to see the fantastic photos. I made the recipe for "Tiffany's Tomatoes" (breaded and fried tomatoes) and they were pretty tasty.
This recipe is an ideal appetizer. It's quick to make and requires very few ingredients. You can also make as much or as little as you like. I made about a tomato and a half for myself as a mid-day snack.
I made a few alterations, see the notations below, mostly because I had various things on hand.
Tiffany's Tomatoes
2 tbsp olive oil (more if needed)
Olive oil cooking spray * I did not do this...I just forgot but they still cooked fine.
4 large, FIRM, red tomatoes, cut into thick slices * I made about two for myself.
Italian flavored panko crumbs * Used seasoned bread crumbs and added some Italian seasoning, worked well.
Milk
Sea salt and freshly cracked pepper, to taste
Heat the olive oil in a skillet over medium heat. Dip the thick slices of tomato in the milk then into the panko crumbs. Season with sea salt and freshly cracked pepper then place into the hot skillet, spray the tops of the tomatoes with the olive oil cooking spray before flipping them. Cook for 2-3 minutes on each side or until golden brown. Place the cooked tomatoes onto a paper towel before placing on the serving plate. Serve with the creamy basil dressing or your favorite creamy dip. Enjoy.
Be sure to let the tomatoes sit a minute or two on several paper towels, otherwise the will be kind of oily, mine could have rested longer. I also skipped the dressing, they were pretty tasty without a dip.
Monday, August 2, 2010
Roasted lemon broccoli
Simple and delicious sides are always hard to come by. I don't want to use more than one pan to make a side dish for only me, yet, I don't want my meals to center on big slabs of meat either. Sometimes I feel that the "American diet" is akin to "big slabs of meat," usually, I feel this way when I'm visiting the Midwest.
This broccoli side dish is delicious and beyond simple. The flavors of the lemon, salt and broccoli are fantastic.
Roasted Lemon Broccoli
1 head of broccoli
1 Tb of olive oil
1 lemon wedge
coarse sea salt
Preheat oven to 425. Toss broccoli in olive oil and place roasting pan. Spritz wit lemon juice and sprinkle with salt and bake for 8-9 minutes.
This simple method to prepare fresh broccoli has quickly become my go to summer side. It's best when it's fresh from the oven and the broccoli is still crisp but passable as a left over side to supplement lunch the next day.